Next: Packages Up: Object-Oriented Programming Previous: final parameter Contents
Java Module System is a major change in Java 9 version. Java added this feature to collect Java packages and code into a single unit called module. In earlier versions of Java, there was no concept of module to create modular Java applications, that why size of application increased and difficult to move around. Even JDK itself was too heavy in size, in Java 8, rt.jar file size is around 64MB. To deal with situation, Java 9 restructured JDK into set of modules so that we can use only required module for our project. Apart from JDK, Java also allows us to create our own modules so that we can develop module based application. The module system includes various tools and options that are given below.
Module is a collection of Java programs or softwares. To describe a module, a Java file module-info.java is required. This file also known as module descriptor and defines the following
It is a name of module and should follow the reverse-domain-pattern. Like we name packages, e.g. com.javatpoint. Creating Java module required the following steps.
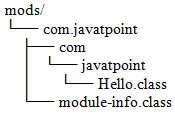
To create module, it is recommended to follow given directory structure, it is same as reverse-domain-pattern, we do to create packages/project-structure in Java.
Create a file module-info.java, inside this file, declare a module by using module identifier and provide module name same as the directory name that contains it. In our case, our directory name is com.javatpoint.

Leave module body empty, if it does not has any module dependency. Save this file inside src/com.javatpoint with module-info.java name. Now, create a Java file to compile and execute module. In our example, we have a Hello.java file that contains the following code.
![\begin{lstlisting}
class Hello{
public static void main(String[] args){
System.out.println(''Hello from the Java module'');
}
}
\end{lstlisting}](img459.svg)
Save this file inside src/com.javatpoint/com/javatpoint/ with Hello.java name. To compile the module use the following command.

To run the compiled module, use the following command.

Output:

To see the compiled module descriptor use the following command.

This command will show the following code to the console.

See, we created an empty module but it contains a java.base module. Why? Because all Java modules are linked to java.base module and it is default module.